Who can tell me which fantasy saga I've been listening to on Audible from the title to my post? If you know, comment below.
There's been so much going on since I last posted way back in September. I'm back in college for the City & Guilds Level 2 in Creative Textile Techniques, and it's already half way through the first term. I've been putting together my portfolio of samples for the Line module, and I've just got to write my conclusion and evaluation. I chose to use Zentangle patters as my design inspiration. The possibilities for developing designs from Zentangle are endless. The only restriction is having enought time to create everything I have the ideas for. It doesn't help that I also signed up to do a level 1 NCFE in Patchwork and Quilting. Although the class is only two and a half hours there's lots of samples to complete. The way adult education is funded makes it virtually impossible to run leisure courses, as the cost to students would be prohibitive. As a result the classes have to have a qualification, which means completing portfolios. All I really want to do is go along and sew a quilt, but that doesn't fit the regime. At least I'm learning lots of new skills.
My shed is really making it much easier to complete all my coursework, and I can do some of the hand sewing when I'm sitting with my feet up.

Saturday, 1 November 2014
Thursday, 11 September 2014
Continuous bias binding
Have you ever wondered how to cut your own bias binding? Since taking up patchwork I knew it was something I needed to learn for binding my quilts, but I was really worried about where to start. As usual, when faced with a problem like this, YouTube often has the answer. I found a great 2-part video tutorial that teaches you how to create yards of bias binding by starting with a square of fabric. Needless to say I had to give it a try, and it worked - I am the proud owner of 3 lengths of bias binding made entirely by me. The tutorial was made by a woman called Marian Drain and her YouTube channel is called CuddleTime Quilts. If you've ever wanted to make bias binding but were too scared to try in case you got it wrong then this technique is for you. As you can test the instructions on a fairly small square there's no risk of wasting valuable fabric - try it out on a 12.5" square of something you don't mind risking. I used some hand dyed cotton that hadn't come out as I'd hoped, but that would make ideal binding if my experiment worked, but that wouldn't be a big deal if I messed up. It worked a treat, and the next step is to test it out to make piping.
Wednesday, 10 September 2014
Equipped to quilt
My black cotton sheeting fabric has arrived, and I've decided that it is the best option for backing the wedding quilt. I've just spent the last 10 minutes clearing the dining room table, with hubby's help, so that I can start creating the quilt sandwiches. I will need to watch Candy Glendenning's video tutorial again, and probably several times, before I start using her quilt-as-you-go technique. We were lucky enough to have a fantastic sale of wonderful quilting cotton on Saturday at a nearby village hall, by Doughty's fabrics, hosted by the local Quilter's Guild. I've decided to join the Quilter's Guild, as well as the Embroiderer's Guild, as everyone was so friendly. I'm also hoping the patchwork class is going to run at the adult learning centre in Morpeth, as I would like to learn new skills, and have the opportunity to finish the Japanese squares quilt with some supervision and guidance.
Craftsy is a great way to learn new skills, and I particularly like a class called Improvisational Piecing, Modern Design with Jacquie Gering. My head is full of design ideas after watching that set of video tutorials. I think I probably have enough fabric to make at least 2 more quilts, using a mix of commercial designs and my own hand dyed cotton.
I also have a good set of quilter's rulers for cutting fabric, and squaring up blocks. Accurate cutting is very important for patchwork, particularly if following a specific pattern. Crazy patchwork allows for cutting strips at angles, but the blocks still need to be cut into appropriate sizes, and the seam allowance edges need nice straight lines for stitching along.
There will be photos to follow, when more of the quilt has been constructed.
Wednesday, 3 September 2014
September already!
I can't believe that it's September already. There's been so much happening that time just flies, including a few days of feeling grotty to slow me down.

As I wrote in my last post I now have a lovely Brinkley loom to work on, and I have quite a few ideas for things I want to weave.
I've also been getting on with the patchwork quilt wedding gift for my cousin. It is now taking shape nicely. I've sewn all the blocks into columns, and I'm adding a border to make it a bit bigger. I'm also contemplating adding some strips between the columns to make it wider. This is how it's shaping up at the moment:
I spread it out on my bed to give me an idea of how it looks, as I don't have the luxury of a quilt wall. I'm trying to work out how to make a DIY quilt wall for designing with completed blocks. It would certainly make getting the blocks into the best arrangement much easier. I'm also working on a quilt design with Japanese print fabrics from a workshop I did at The Quilter's Cupboard in Langley Moor, County Durham, last weekend. It's quite complex for a beginner like me, with prairie points forming a border around a frame! In order to get some help I've put my name down for an NCFE level one patchwork class at the local adult learning centre - fingers crossed that the class has enough students to go ahead. If not, the tutor for the workshop is available at the shop for assistance every Wednesday. I don't have pictures of my progress on that one, but I did manage to complete two rows.
I'm now waiting for the fusible batting (wadding) to arrive. I want to try a "quilt as you go" technique by a quilter called Candy Glendening. The tutorial can be found via her blog - http://www.candiedfabrics.com - and I need to decide on the backing before I can start quilting it. I'm torn between a plain black backing and an improvisational pieced crazy quilt backing. Craftsy have a great class called "Improvisational Piecing, Modern Design" with a tutor called Jacquie Gering. I watched the whole thing in one sitting, and got lots of ideas from it.
College will be starting in a couple of weeks, so I'm excited about what new skills I'll learn there. September also includes my 50th birthday, so I'm looking forward to a great month.
Saturday, 16 August 2014
Hand Weaving on a Brinkley Loom
This week I was able to set up my new Brinkley loom, and weave my first solo piece. I have blogged about this loom before, when I did a weaving workshop with Eve Studd at Cornhill Crafts. I fell in love with the loom then, and now I have my own.
 The beauty of this loom lies in its simplicity. It consists of a beech wood frame, and a special finned heddle that also acts as the beater. It is warped by placing a broom handle through 2 holes in the frame, balancing it across two chair backs, tying on the warp thread, and rotating the frame until you have the desired number of warp threads. The special heddle is then placed into the frame, between the top and bottom threads. Each top thread has a place in the fins on the heddle, and you rotate the heddle towards yourself to change the shed. The weft can be almost any material you want, including yarn, unspun wool fleece, and even twigs.


The beauty of this loom lies in its simplicity. It consists of a beech wood frame, and a special finned heddle that also acts as the beater. It is warped by placing a broom handle through 2 holes in the frame, balancing it across two chair backs, tying on the warp thread, and rotating the frame until you have the desired number of warp threads. The special heddle is then placed into the frame, between the top and bottom threads. Each top thread has a place in the fins on the heddle, and you rotate the heddle towards yourself to change the shed. The weft can be almost any material you want, including yarn, unspun wool fleece, and even twigs.
I used double knitting yarn in the warp, and chunky weight knitting yarn in the weft. This piece is just over 5 foot long. I plaited the cut ends of the warp threads to finish it off. I'm keeping this one for myself, as a scarf. I'm planning lots more pieces to use up my yarn stash, give as gifts, and incorporate into my C&G level 2 course work.
Wednesday, 13 August 2014
Taking time to recover
Those of you with chronic illnesses like MS, Fibro, ME, etc, will understand what I mean by "taking time to recover". Every activity, no matter how small, no matter how much I enjoy it, takes energy. That's why it's been a while since I've written anything. Using my brain takes as much, if not more sometimes, of my energy as physical tasks. Even having a holiday is tiring!
Since coming back from Norway I've needed time to recuperate. We had a big family party down in Hertfordshire, and I've been on two workshops: retouching and restoring old photographs, and freestyle weaving. Every day out requires 1-2 days of inactivity just to be able to function again. So if you are a person in good health and you know someone with a disease like mine don't expect them to be able to do all the things you can do. Don't say " Yes, I get tired", or "You just need to get out more/eat more greens/go to the gym". Instead, ask them what you can do to help.
Since coming back from Norway I've needed time to recuperate. We had a big family party down in Hertfordshire, and I've been on two workshops: retouching and restoring old photographs, and freestyle weaving. Every day out requires 1-2 days of inactivity just to be able to function again. So if you are a person in good health and you know someone with a disease like mine don't expect them to be able to do all the things you can do. Don't say " Yes, I get tired", or "You just need to get out more/eat more greens/go to the gym". Instead, ask them what you can do to help.
Sunday, 20 July 2014
I'm home
I arrived into the Port of Tyne on Friday morning after a fabulous trip to Norway and Murmansk. I even have a certificate to prove I've crossed the Arctic Circle. What an experience! We saw beautiful scenery; enjoyed mixed weather from hot sunshine to thunder storms; met a wide range of people; and had a ball.
Our ship was the Marco Polo, and was originally a Soviet ship. It is 50 years old next year, and is going in for a refit in November to prepare it for a series of birthday cruises. We attended a fascinating talk on its history. It was designed to withstand ice, so it is actually a liner rather than a cruise ship, and has a reinforced hull. The crew were international; some were excellent, and others need customer service training. I'm going to write to Cruise and Maritime with detailed feedback - there's no point in moaning to other passengers about the things that need to be improved when only the company can put things right. Some passengers were critical of things that no one could control, like the weather. My criticisms relate to the attitude of one particular receptionist, and a few bar staff.
Our route was the same as that taken by the Arctic Convoys in WWII, and there were 3 veterans on board. We learned a lot from a guest lecturer about the Convoys. Many on the places we visited in Norway had been razed to the ground by the occupying Nazis as they retreated, and so the building were comparatively new. For anyone interested in history, Norway has centuries of it.
One of the highlights for me was meeting a fellow textile enthusiast at the Viking longhouse museum. She was spinning wool with a drop spindle. We got chatting, and I discovered that she and I had something else in common - MS. Unfortunately the photograph I took is blurred. She is a professional dyer, and told me how the Vikings dyed with woad. They used fermented urine - and you know it's fermented when it no longer smells - and placed the container with the wool, woad and urine in the centre of a horse dung heap because the temperature there is exactly right!
There was just the right balance of excursions and rest days to make this holiday ideal for someone with a condition like MS.
Thursday, 3 July 2014
Just 24 hours until embarkation
Tomorrow I embark on my first ever cruise holiday. I have a lovely kind and generous friend with whom I have occasional holidays. In 2010 we went to Florence; last year it was Masham in Yorkshire. This year it's a 14 night cruise called North Cape and Land of the Midnight Sun, which is mostly Norway but also includes Murmansk in Russia.
We chose this holiday on the basis of it being MS-friendly - the ship departs from Newcastle (actually the port is in North Shields, but they call it Newcastle) so it's just a 15 mile drive to get there. Our luggage is taken to our cabins for us, all our meals are made for us, and all we have to do is enjoy the trip. I know another person with MS who has gone on several cruise holidays, and she says it's the ideal vacation for people like us. The only draw back I have identified so far, in comparison to a self catering holiday, is the lack of a washing machine. This may sound odd, the thing is on a cruise you have to dress for dinner, and there are two formal evenings. That's a lot of clothes, especially when you can't wash your day wear to use it twice. Can you imagine how many pairs of knickers are required!!! I have two sizeable pieces of luggage filled to almost bursting. The only things left to pack in the luggage are the items that I need to use before we go - mainly make up and toiletries. I even have a small folding stool for excursions so that I don't have to stand as standing causes fatigue and back pain.
I bought a small rucksack last week when I was in Northern Ireland. I have to try to fit a variety of objects into it - vacuum flask for excursions, iPad, Kindle, medication, and something to keep my hands busy on the days we are at sea. I've been contemplating how to put together an embroidery kit that isn't too bulky. I may end up just taking my Zentangle book, pens and pencils. That should be enough, along with the reading material on the iPad and Kindle, to keep me meaningfully occupied when not ashore.
I should have plenty of photographs to share on my return. I'll be back on 18th July with lots to tell you.
Tuesday, 1 July 2014
A lovely family holiday
This summer, due to GCSEs, my husband's work schedule, and my trip to Norway with my dear friend Janet, the three of us only had one week when were all together to have a family holiday. Our original plan had been to go to Orkney, but when that didn't work we decided to go to my native land - Northern Ireland. We chose a small apartment on the coast at Portstewart so that we could explore places like the Giant's Causeway and Dunluce castle - or at least Stephen and Owen could explore them as they are not really suitable for my limited mobility. We haas a wonderful time, and managed to see several family members. I hope you enjoy these photos of the wonderful scenery:


Sunday, 15 June 2014
All Done
I finally finished my course work, and completed my portfolios for my City and Guilds, on Wednesday night. I took everything into college on Thursday, and discovered I needed to write evaluations of my A3 samples too. That took until lunch time. Now I'm on holiday until the level 2 course starts in September. Of course that doesn't mean I won't be actively creating things. I have a lovely piece of ice dyed cotton scrim that I want to nuno felt along the raw edges to make a shawl; two maxi skirts to turn up, as they are too maxi for my mini height; a piece of ice dyed cotton that I want to use to make an upcycled skirt, using the top of an old pair of jeans; and the patchwork quilt I want to make for my cousin as a wedding present. So I have plenty to keep me busy.
If anyone in Northumberland would like to see the work that the art faculty students produce at the college there is an end-of-year exhibition at the Ashington campus, on the ground floor of the college.
Here are some photos of City & Guilds level 2 and 3 students' work. The first one is Denise Primrose,with the corset she made.


Sunday, 8 June 2014
Another week flown by
I can't believe it's been a whole week since I posted anything here. It has been busy, tiring, and, at times, enjoyable.
I'm currently preoccupied with finishing my C&G course work. The Texture book has been completed; I'm doing the final bits of stitching for Line, and I need to take some photos for my A3 pieces.
Although I have enjoyed my art evening class I won't do another one next year. It's just too tiring, especially as I've enrolled for my level 2 C&G in Creative Textiles. I've also been elected onto the local MS Society branch committee, and been asked to do the newsletter, so I'll have more than enough to keep me busy.
I finally made it to an Embroiderer's Guild meeting in Alnwick on Saturday afternoon. There was a fascinating speaker called Joanna O'Neill. She's a really multi-talented woman. You can see for yourself on her website: www.richstitch.com. Pop along and have a look.
Sunday, 1 June 2014
Complex Cloth
I bought a used copy of "Complex Cloth A Comprehensive Guide to Surface Design" by Jane Dunnewold on Amazon Marketplace, and it was delivered yesterday. So far, due to doing other things yesterday, I've only managed to read the introduction, but what an introduction - I quote: "How can we make the cloth sing?" This question deeply resonated with me, as did Jane's assertion: "It is possible to create fabric of great depth and complexity - what I call 'complex cloth' - simply by beginning with white fabric and layering surface-design processes like dyeing, painting, bleaching, and foiling over one another until a pleasing result is achieved." If you've read my earlier blog posts you will know that I love dyeing and block printing fabric. Now I have a guide to these techniques, and more. This book was written in 1996, and there have been further developments in textile art materials, but it should give me a good jumping off point. Many of her techniques are used by fibre artists like Angie Hughes, so by combining the things I learn in college with this book and my Colouricious DVDs, I have lots of scope for experimenting to create my own complex cloth.
Tuesday, 27 May 2014
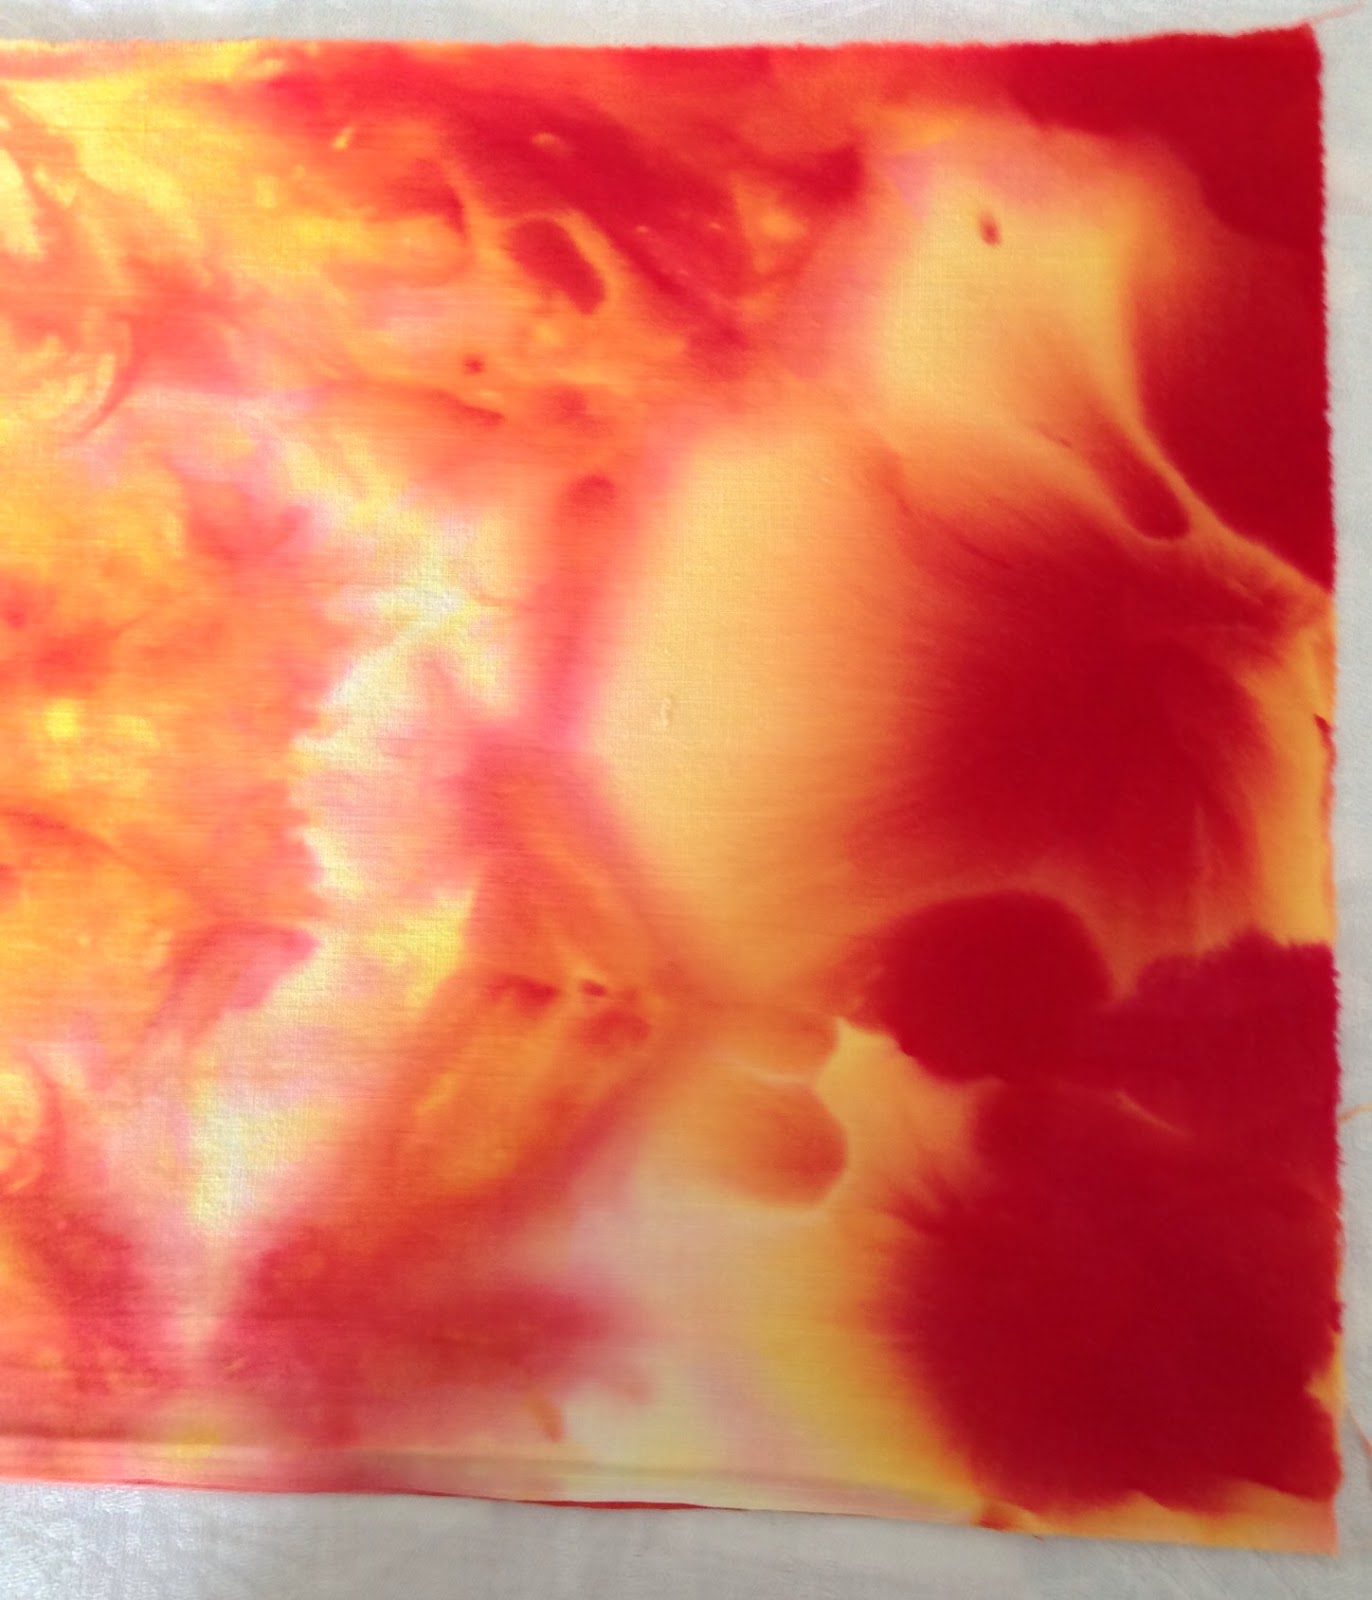
Step by Step Ice Dyeing
Ice dyeing is straightforward, and gives amazing results. If, like me, you love the surprises that random dyeing techniques give then ice dyeing is for you.
The first step is to wash your fabric to remove any starch or manufacturer's dressing. Then you need to soak your fabric in a soda ash solution. This will ensure the dye is fixed, and makes the fabric washable. You need one cup of soda ash per gallon of water - I got the directions from an American website, but you can use google to find UK or European equivalent measurements.
While the fabric is soaking you can set up your dyeing station. You need a rack that you can arrange the fabric on and cover with ice cubes; and under the rack you need something that the melted ice & dye mixture can drain into. I found plastic garden riddles in a local branch of Yorkshire Trading. Some people use the cooling racks that you put cakes on. I placed my riddle over a washing up bowl. You can place fabric in the bottom of the tub that will catch the melted ice water, and get great effects.


Decide what colours you want to use, bearing colour theory in mind as the dyes will blend as the ice melts. For this project I used peach, magenta, and yellow Procion mx dye.


The fabric in the riddle before being rinsed out and washed.


The first step is to wash your fabric to remove any starch or manufacturer's dressing. Then you need to soak your fabric in a soda ash solution. This will ensure the dye is fixed, and makes the fabric washable. You need one cup of soda ash per gallon of water - I got the directions from an American website, but you can use google to find UK or European equivalent measurements.
While the fabric is soaking you can set up your dyeing station. You need a rack that you can arrange the fabric on and cover with ice cubes; and under the rack you need something that the melted ice & dye mixture can drain into. I found plastic garden riddles in a local branch of Yorkshire Trading. Some people use the cooling racks that you put cakes on. I placed my riddle over a washing up bowl. You can place fabric in the bottom of the tub that will catch the melted ice water, and get great effects.
Fabric to be dyed in the plastic riddle
Fabric covered with ice cubes.
When the fabric has been soaking for 30 minutes remove it from the soda ash solution, wring it out and place it on your chosen rack. Crumpling the fabric helps create the pattern. Then completely cover the fabric with ice cubes. For this project I used a 2Kg bag of ice. I had two long strips of 10" wide dry cotton in the basin, which had previously been treated with soda ash.
When the fabric has been soaking for 30 minutes remove it from the soda ash solution, wring it out and place it on your chosen rack. Crumpling the fabric helps create the pattern. Then completely cover the fabric with ice cubes. For this project I used a 2Kg bag of ice. I had two long strips of 10" wide dry cotton in the basin, which had previously been treated with soda ash.
Decide what colours you want to use, bearing colour theory in mind as the dyes will blend as the ice melts. For this project I used peach, magenta, and yellow Procion mx dye.
Sprinkle your chosen Procion dye randomly over the ice cubes. Wear a dust mask to avoid breathing in any dye powder as it is a hazardous substance. When you have sprinkled the dye powder on the ice, cover the whole thing with plastic. Leave for 24 hours, allowing all of the ice to melt. Once all the ice has melted you can rinse out the dye and wash the fabric as normal.
The fabric in the basin before being rinsed out and washed.
And some of the results:
Thursday, 22 May 2014
The wonderful work of Jenny Adin-Christie
On Saturday 17th June I was Lucy enough to have been invited by 3 of the members to the Embroiderer's Guild regional meeting. The highlight of the day for me was the talk by Jenny Adin-Christie. This is a brief summary of Jenny's talk. If the opportunity presents itself go and hear her in person.
Jenny is a Graduate Apprentice of the Royal School of Needlework, and she began her talk by giving us some history of the RSN. I was fascinated to learn that it had been set up by Lady Victoria Welby to create respectable employment for genteel women. The School started with 20 young girls who, after training, worked a 50 hour week. They produced amazing hand embroidered furnishings. The School was criticised for its eclecticism and lack of house style so designers, including Gertrude Jekyll, William Morris and Edward Burne-Jones, were commissioned.
The School was responsible for embroidering the Coronation trains for Queen Elizabeth, the Queen Mother, and also for the Queen. The Queen's train was made from specially woven silk velvet and took 10 women 2 and a half months to complete. The Queen is the current patron of the School.
When Jenny was an apprentice at the School she was trained in gold work to coronation standard, as well as learning crewel work, two kinds of silk shading and white work. The school teaches "both sides alike" embroidery, which was developed for regimental banners. At the time when she was training the School employed their students when their apprenticeship was completed, and Jenny worked for them spending 50% of her time teaching and 50% of her time stitching. Projects she worked on include stitching the tiny coat of arms on gloves for The Lord Chief Justice and, at the other end of the scale, the Royal Opera House Curtains. Other work by Jenny includes white work monogramming for Paul McCartney and alter frontals for Canterbury Cathedral.


Perhaps the most widely recognised piece of work Jenny has been involved with very recently is Kate Middleton's wedding dress. She was one of 70 women involved in stitching the lace motifs onto panels to create the dress. She also stitched the monogram on the cashmere baby gifts from Sarah Burton to Prince George.
Jenny is now a freelance specialist embroiderer and tutor. She undertakes bespoke commissions, designs, teaches groups and individuals, gives talks and lectures, and has a range of kits for sale on her website. If you ever get an opportunity to hear Jenny speak, or attend one of her classes, then grab it with both hands! The whole audience was captivated by her presentation. It is now my ambition to participate in one of her workshops - preferably in sunny France.
Jenny is a Graduate Apprentice of the Royal School of Needlework, and she began her talk by giving us some history of the RSN. I was fascinated to learn that it had been set up by Lady Victoria Welby to create respectable employment for genteel women. The School started with 20 young girls who, after training, worked a 50 hour week. They produced amazing hand embroidered furnishings. The School was criticised for its eclecticism and lack of house style so designers, including Gertrude Jekyll, William Morris and Edward Burne-Jones, were commissioned.
The School was responsible for embroidering the Coronation trains for Queen Elizabeth, the Queen Mother, and also for the Queen. The Queen's train was made from specially woven silk velvet and took 10 women 2 and a half months to complete. The Queen is the current patron of the School.
When Jenny was an apprentice at the School she was trained in gold work to coronation standard, as well as learning crewel work, two kinds of silk shading and white work. The school teaches "both sides alike" embroidery, which was developed for regimental banners. At the time when she was training the School employed their students when their apprenticeship was completed, and Jenny worked for them spending 50% of her time teaching and 50% of her time stitching. Projects she worked on include stitching the tiny coat of arms on gloves for The Lord Chief Justice and, at the other end of the scale, the Royal Opera House Curtains. Other work by Jenny includes white work monogramming for Paul McCartney and alter frontals for Canterbury Cathedral.
Perhaps the most widely recognised piece of work Jenny has been involved with very recently is Kate Middleton's wedding dress. She was one of 70 women involved in stitching the lace motifs onto panels to create the dress. She also stitched the monogram on the cashmere baby gifts from Sarah Burton to Prince George.
Jenny is now a freelance specialist embroiderer and tutor. She undertakes bespoke commissions, designs, teaches groups and individuals, gives talks and lectures, and has a range of kits for sale on her website. If you ever get an opportunity to hear Jenny speak, or attend one of her classes, then grab it with both hands! The whole audience was captivated by her presentation. It is now my ambition to participate in one of her workshops - preferably in sunny France.
Wednesday, 21 May 2014
Block printing
I'm in love with block printing! Yes, I'm a fickle crafter - there are just too many things I love. As I mentioned in a previous post, I've invested in some wood blocks and workshop DVDs from Colouricious. I watched the DVD on printing with the wooden blocks before attempting it, and I'm glad I did. The DVD is full of tips on how to get the best patterns. The sun is shining in Morpeth today, so I'm hoping to get some photographs taken.
I also want to try ice dyeing today, if I can get myself organised enough.
More good news - I've heard back from Jenny Adin-Christie, so I'll be blogging about the talk she gave at the weekend very soon. Watch this space.
I also want to try ice dyeing today, if I can get myself organised enough.
More good news - I've heard back from Jenny Adin-Christie, so I'll be blogging about the talk she gave at the weekend very soon. Watch this space.
Sunday, 18 May 2014
This week's exciting things
There has been quite a lot happening this week, and so today is very much a day of rest. I'm writing this while sitting up in bed drinking coffee, and forcing myself not to get up and play with all the lovely things I'm going to tell you about.
I think I mentioned wooden printing blocks in a previous post. Well, the wonderful Colouricious website (http://colouricious.com) has fabulous things for textile artists and crafters. I got their email newsletter last week which gave details of a special offer this month - all their DVD workshops half price. I knew that tucked away in my emails was one from them when I signed up for the Colouricious Club (which is free) giving me 20% off my first order. This meant I could buy the DVDs for half price and get a further 20% off too. Needless to say it was a done deal; and since I was getting the 20% off it made sense to buy the wooden printing blocks I wanted at the same time. They were all delivered yesterday! Now you'll understand why I want to dash out to the studio shed and play.
At my art class on Tuesday evening I got to use the tutor's top quality Unison chalk pastels. This experiences reinforced the lesson learned that, with art materials, you get what you pay for. Even my limited talents can produce a better result with the right materials. These pastels are handmade in Tarset, Northumberland. The colours are wonderful, and the texture is creamy. If pastels are your medium of choice I definitely recommend you try these.
On Thursday at college I had the space to lay out all of the work I've done for the Line module to see where there are gaps to be filled, as well as checking on anything else that is needed for texture. I've almost completed the work needed for both. I'm both delighted to have almost finished, and sad that I won't have any more classes for months. I do have the level 2 course starting in September to look forward to.
Last but not least I went to the Embroiderer's Guild Regional Day yesterday. I met a lovely group of ladies and attended the talks by two professional Embroiderer's. The first speaker was Jenny Adin-Christie, who trained at the Royal School of Needlework. She was one of the 70 needle-women who worked on Kate Middleton's wedding dress. I've emailed Jenny to ask if I can put some photographs of her work here as I'm planning a blog post on her talk. The other speaker was Jane Smith of Japanese Embroidery UK. Her work is beautiful too, but I'm afraid I was so enchanted by Jenny that Jane's talk suffered by coming after lunch. Japanese embroidery is very traditional and has a set style. It looks stunning, but the materials are expensive and the time it takes to learn it properly was off-putting to most people. Do take a look at Jane's websites: www.nejiribana.co.uk and www.japaneseembroideryuk.com as you might want to try it.
Saturday, 17 May 2014
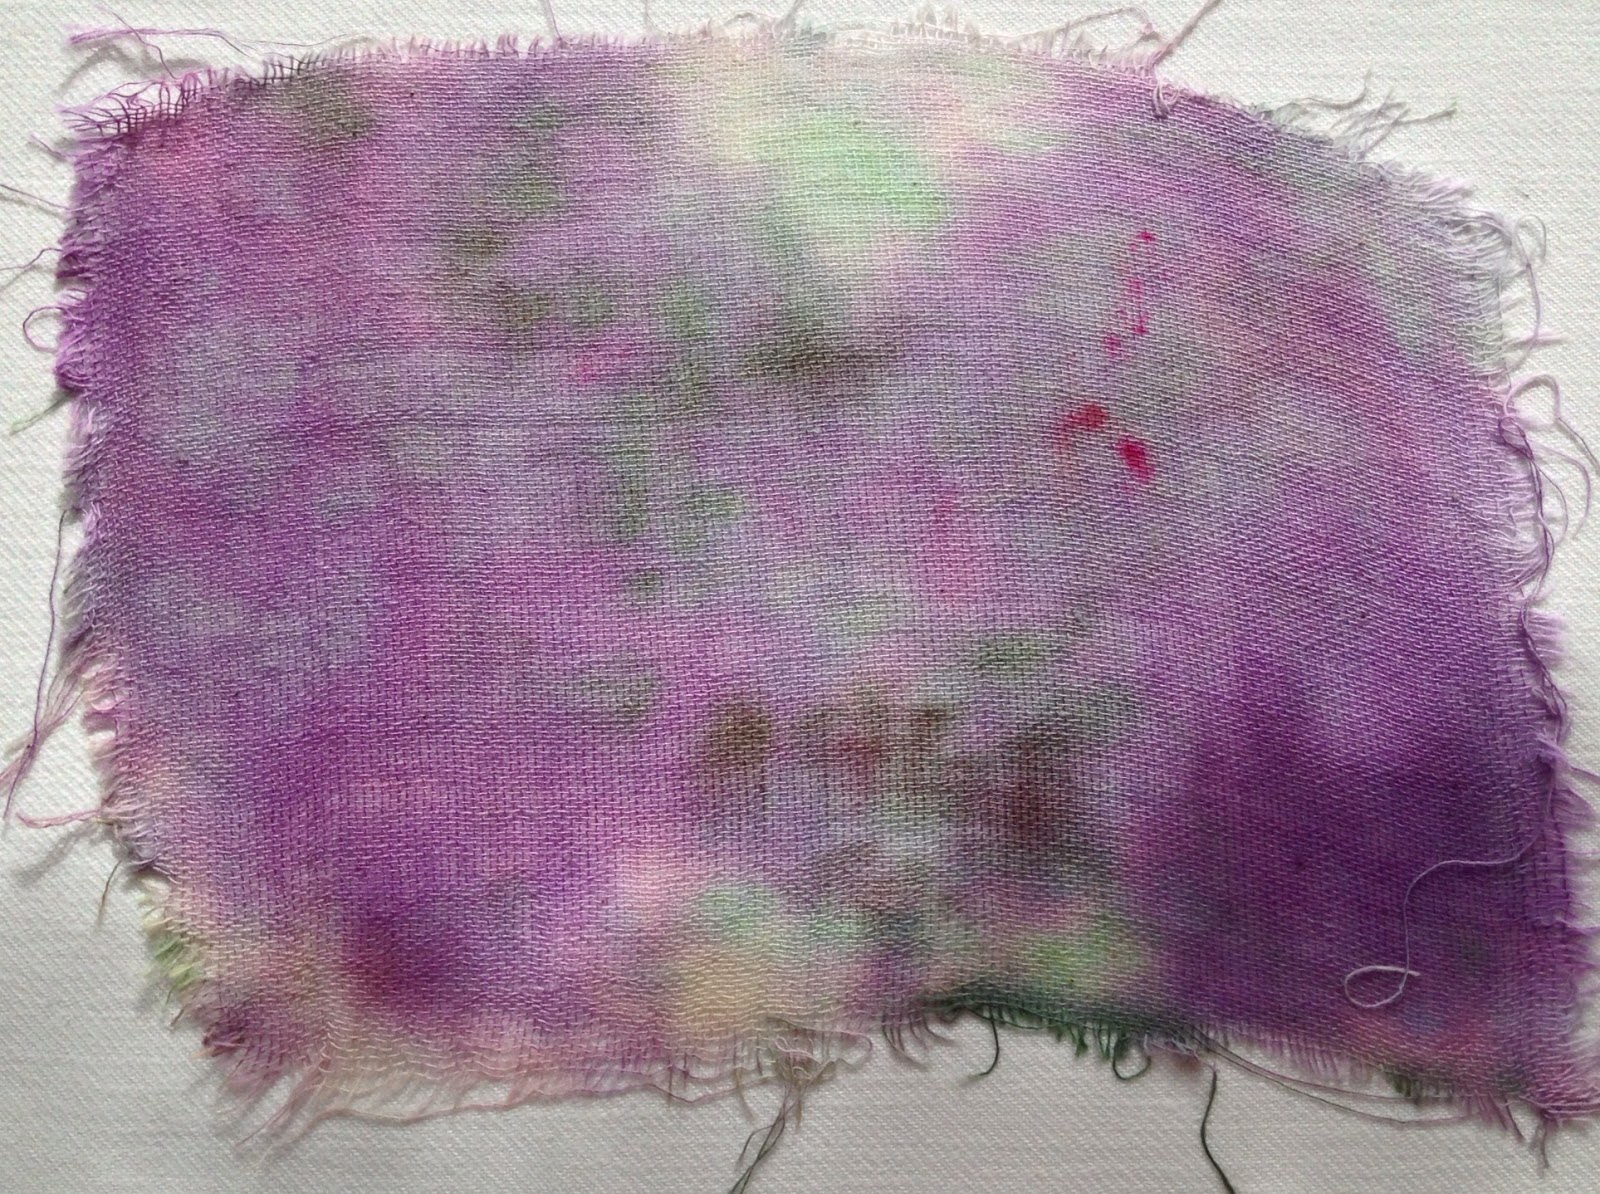
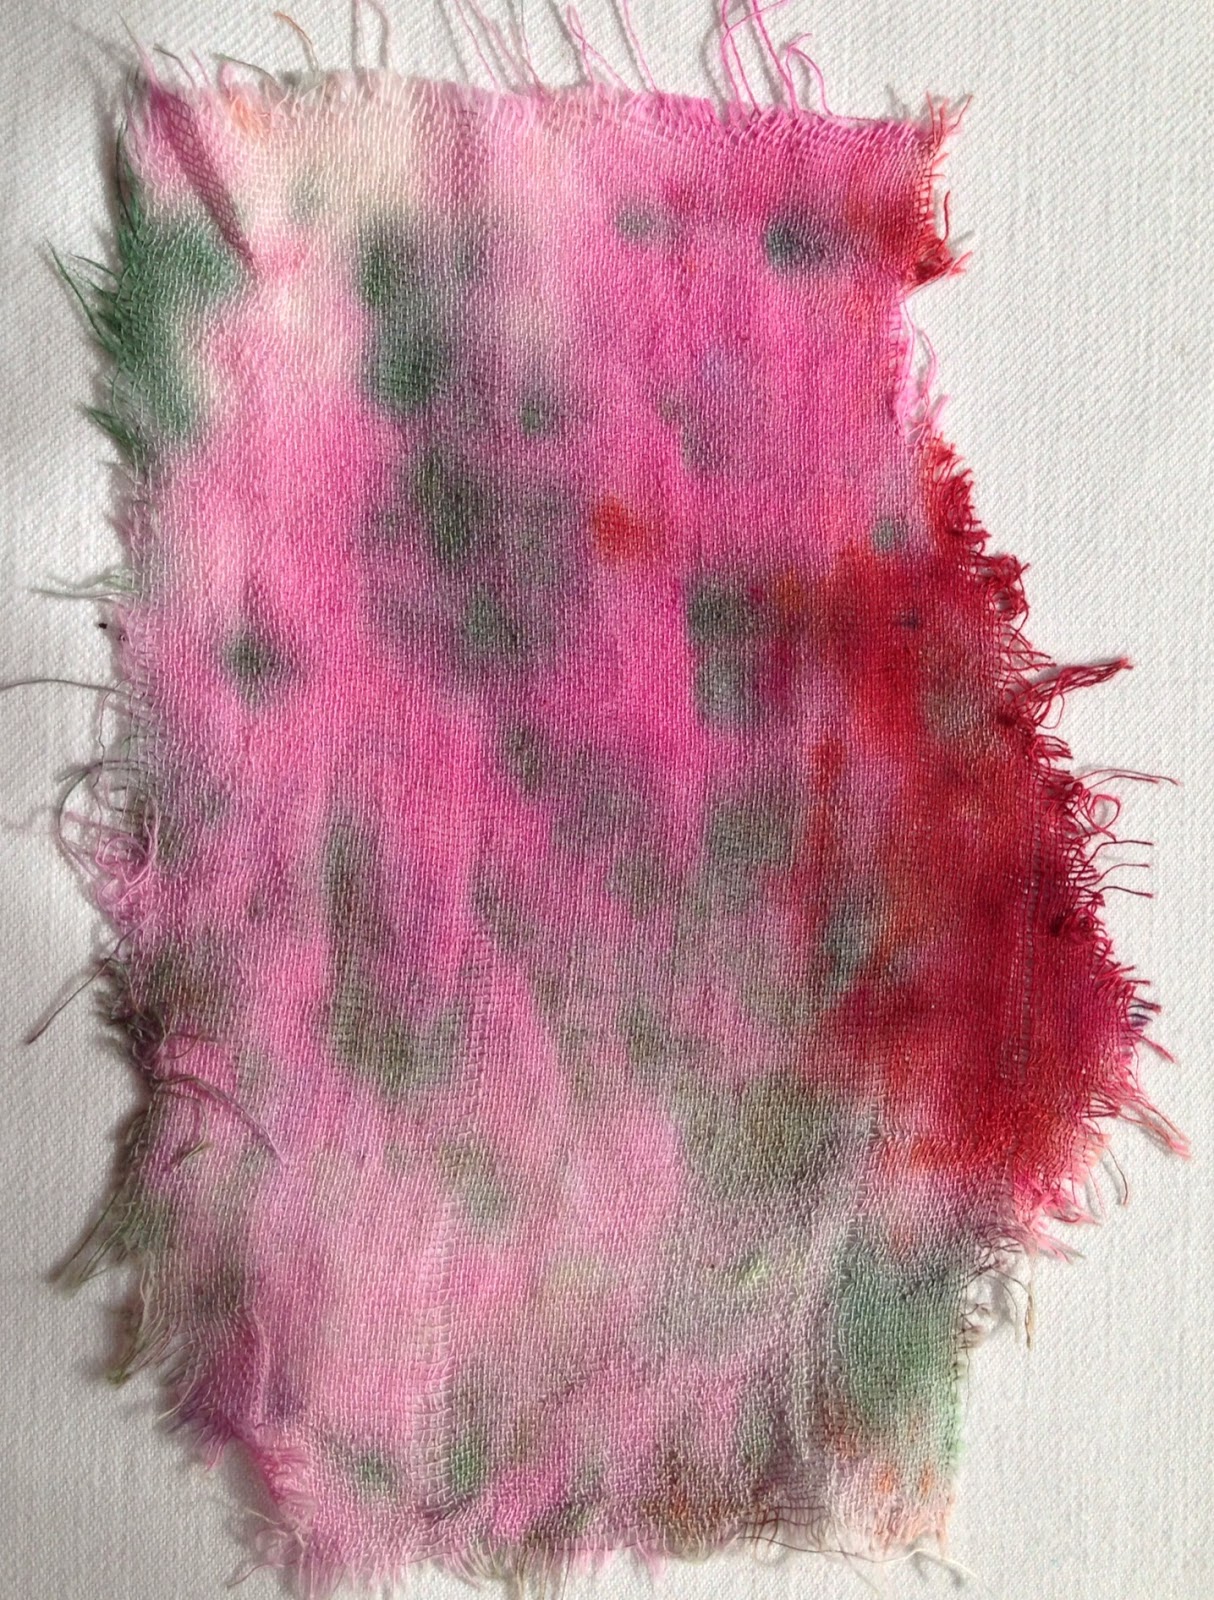
Serendipity Dye Results
When I was doing the large batches of dyeing with the Dylon hand dye I found that some dye powder didn't dissolve. I filtered the dye through small fragments of unbleached muslin. These are the results -


Monday, 12 May 2014
Operation Over-Dye
Well I've spent most of today over-dyeing my previously, and not too successfully, dyed fabric. I'm hoping that I have created enough usable material, that I'm happy with, to make the quilt I have in mind. At the moment I'm contemplating the purchase of some wooden printing blocks from the Colouricious website. They have some wonderful designs that might just be perfect to use on the patchwork squares, to give it the unique quality I was hoping to achieve by hand dyeing.
This project has taught me some important lessons in relation to dyeing fabric:
1. To get the tie-dye or shibori effect that I particularly like when I hand dye I need to use Procion MX cold water dyes;
2. Dylon hand dyes are great for using in a pot on the hob to dye things a uniform colour;
3. The effects I love look best on large pieces of fabric, so I need to learn how to design my own patchwork quilt patterns that can incorporate large pieces, and showcase them to their advantage.
I know I can achieve the results I want - it just might take longer than I'd anticipated.
Sunday, 11 May 2014
New life for old sheets
The last time I met up with the lovely Jayne Hewison, textile designer, we had a really good rummage on the stalls at Tynemouth market. I came away with, amongst other things, a pair of unused 1940s Utility bed sheets, still held together with their original ties. I've decided to use them as the basis of the hand dyed quilt I have planned, and I have finally finished dying the first one. The last pieces are in the washing machine as I type. I'm delighted with some of the effects I've achieved, and less impressed with others. Now it's time for a rest. I'll wait 24 hours, then I'll lay out all the pieces, decide which ones are worth keeping as they are, and which ones need to be over dyed. That's the great thing about this kind of hand dyeing - I can continue to alter the colours until I'm happy with them. I'll stick to using the Dylon dyes in the same palette until I'm satisfied with the results, but in future I'll buy procion cold water dyes as I find them easier to work with. I can see me buying one or two colours in large packs per month until I've got a good range to work with. I'm also thinking about putting together packs of hand dyed textiles and paper to sell, if anyone is interested. Watch this space for photos.
Friday, 9 May 2014
Oodles of colour
One of my favourite textile based pastimes is dyeing fabric and lace. I can happily spend hours folding up pieces of cloth into bundles, and dropping dye on to it, to create unique patterns.
That's what I spent Wednesday afternoon, and most of today, doing. In the past I've shared photos of my dye day results here. Those pieces were done with cold water procion dyes, which are fixed with soda ash to make them colour fast. My latest experiments have been with Dylon hand dyes, which require heat. I've been using an old microwave that I got free, via Freecycle, to provide the heat. I have to say I think I prefer the procion dyes. I do however have a batch of Dylons made up, and I'm not going to waste it!
My current experiments with these are not just for fun. I've decided that I want to make my cousin and his fiancée a patchwork quilt as a wedding gift, and being me I want to hand dye the fabric for it. So I shall spend the next few days trying out different combinations, and hopefully I'll achieve the desired results. If not I may have to resort to plan B, and buy the fabric ready printed. Wish me luck.
Wednesday, 7 May 2014
Textile Stories Exhibition at Newbiggin
Here are some photographs from the exhibition where my work from the Lynemouth workshops was featured, along with that of 3 internationally renowned textile artists. I didn't manage to photograph everything. This is a selection of what was on display.


Subscribe to:
Comments (Atom)